Android App Integration
Connect your Android app with Monetai to track revenue from Google Play Store in real-time.
Integration Methods
Android app integration can be set up using the following two methods:
Method 1: Dashboard Onboarding Section
- Access Monetai Dashboard
- Set up app integration in the top onboarding section
Method 2: Settings Menu
- Navigate to Settings > App Settings menu
- Set up app integration
Integration Process
Android app integration consists of 3 steps, with detailed procedures for each step.
Step 1: App Package Integration
1-1. Enter Package Name
Retrieve the package name from Google Play Console and enter it.
Setup Method:
- Log in to Google Play Console
- Select the app to connect with Monetai
- Copy the package name of the app (e.g.,
com.example.app) - Enter it in the Monetai dashboard

Step 2: Google Service Account Creation and Key Issuance
Create a service account for Google Play Store API access and configure permissions.
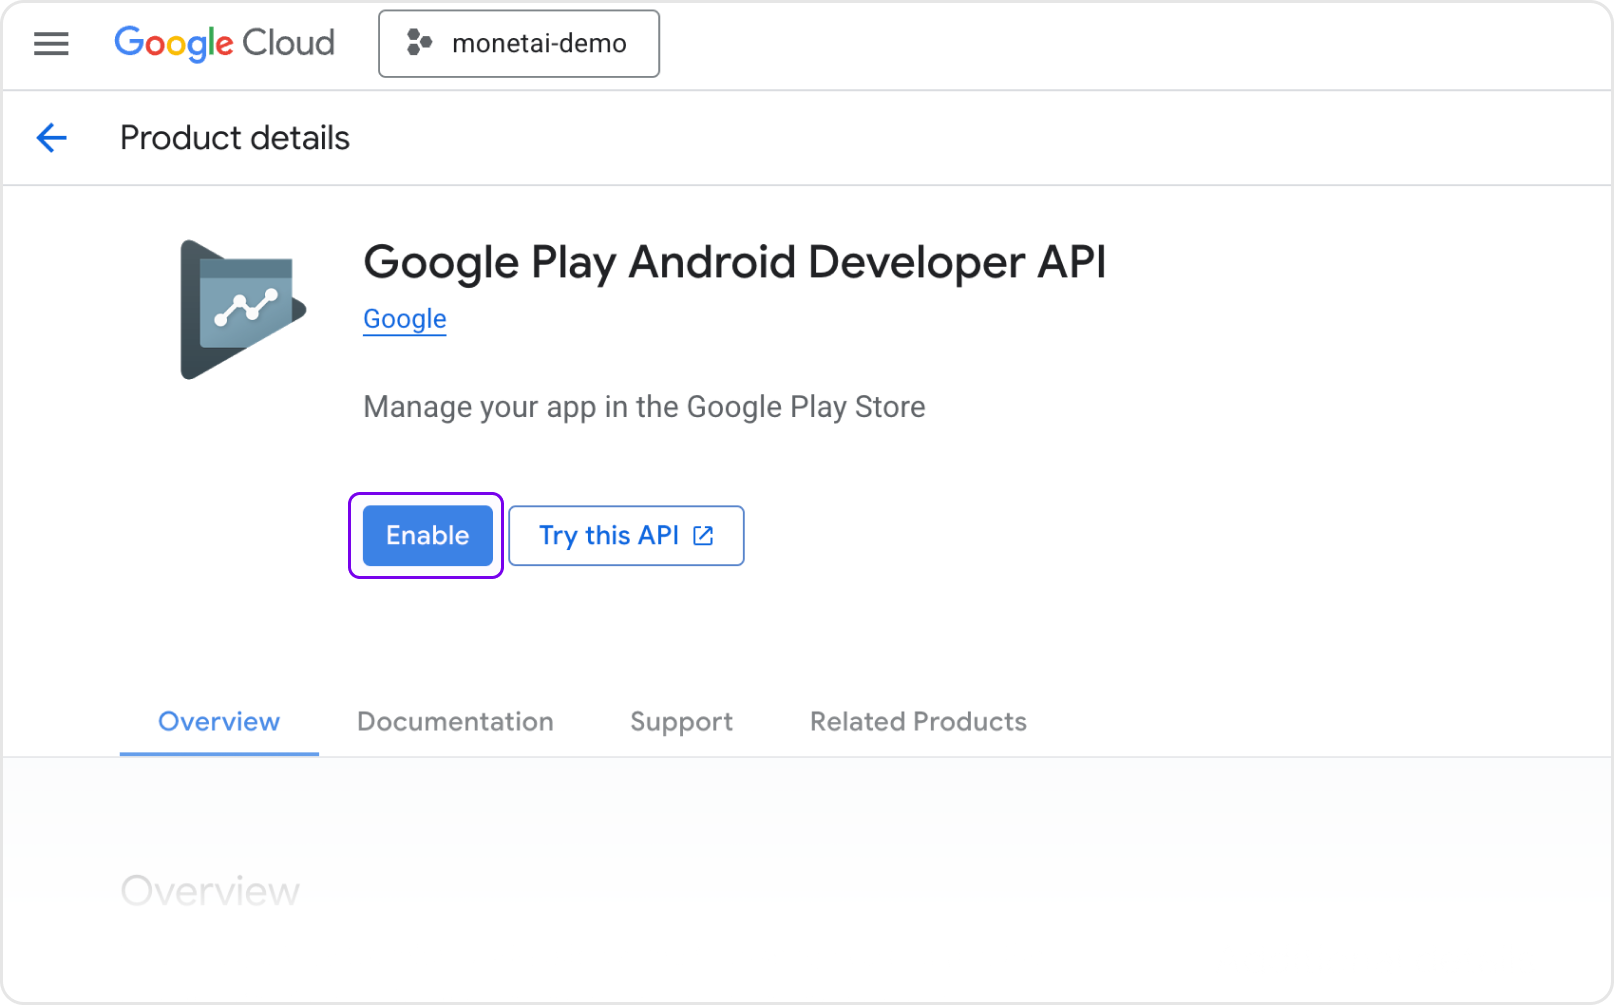
2-1. Enable Google Developer API
Setup Method:
- Select a project or create a new project in Google Play Console
- Search for Google Play Android Developer API
- Click the [Enable] button
2-2. Create Service Account
Setup Method:
- Navigate to [IAM & Admin] > [Service Accounts] in Google Cloud Console
- Click [Create Service Account]
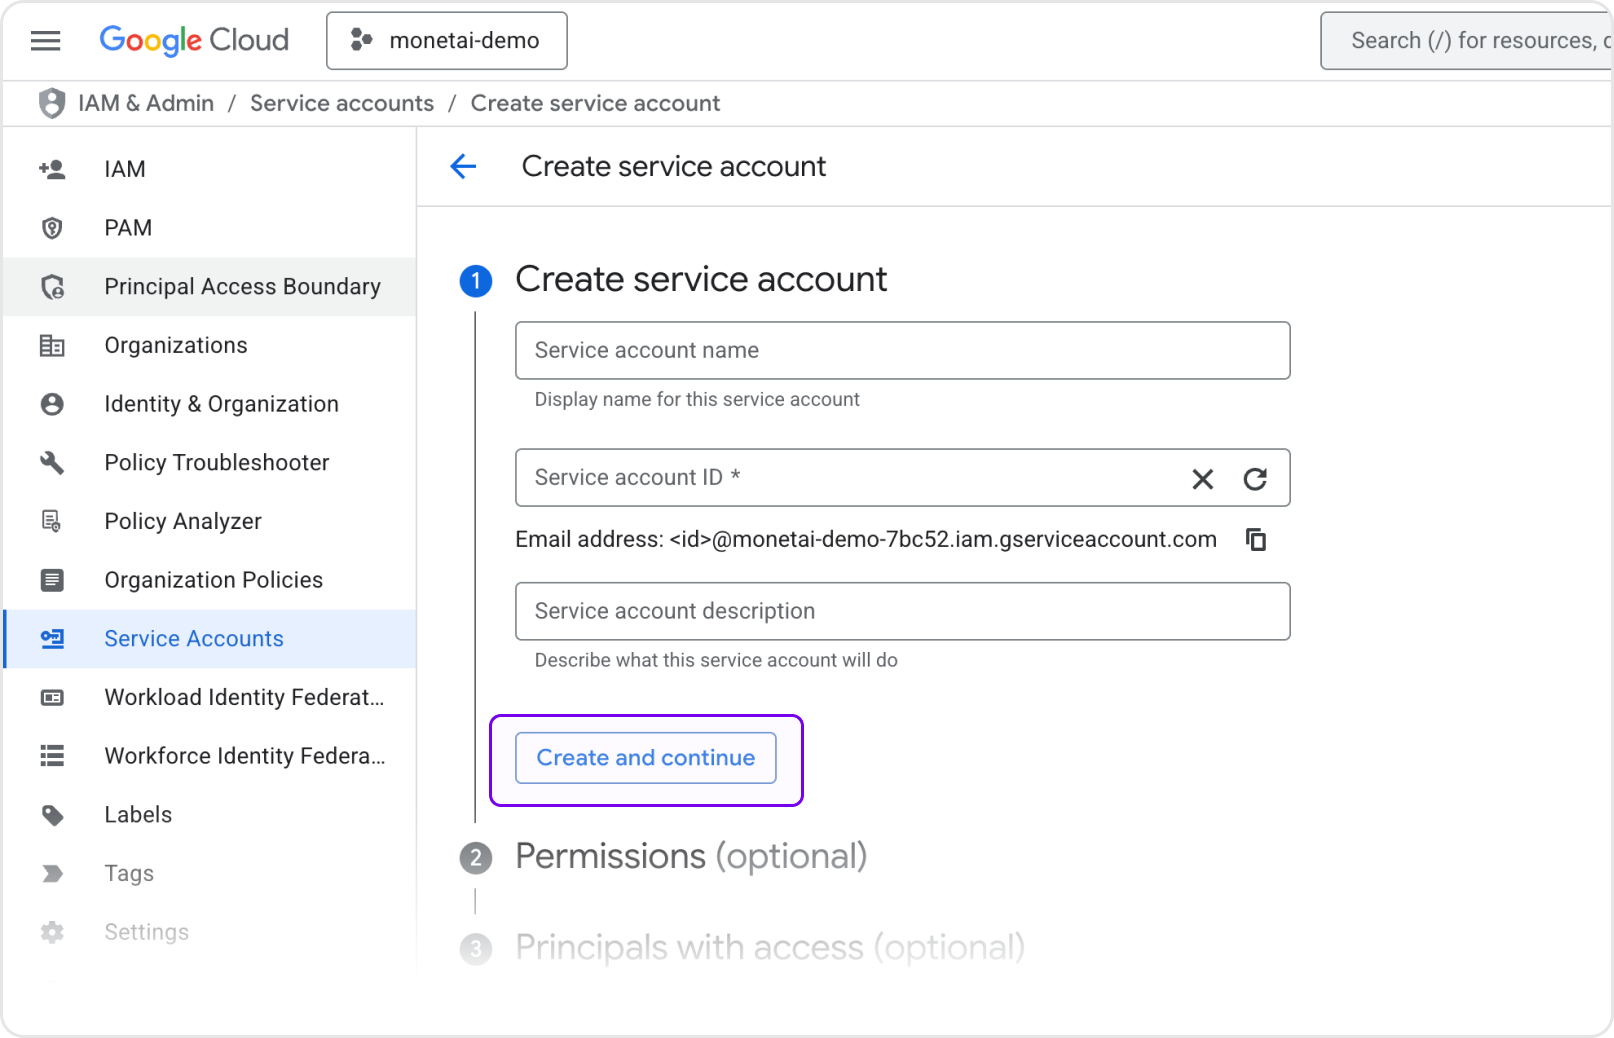
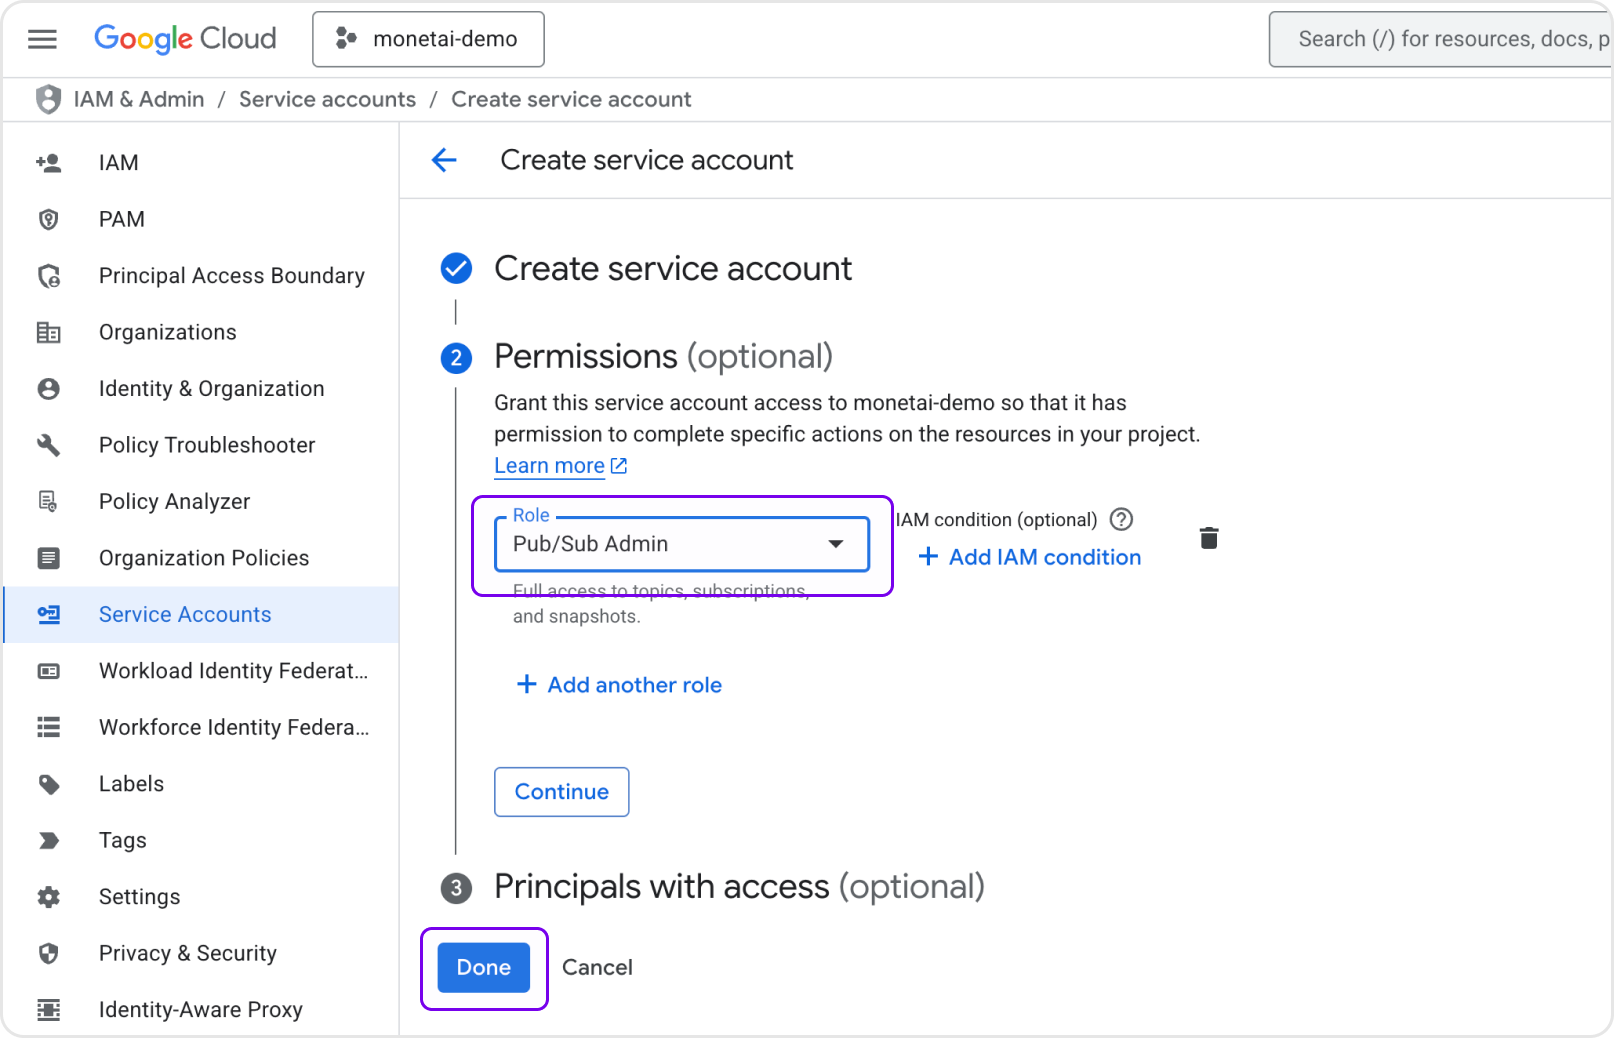
- Enter service account name and click [Create and Continue]
- In the [Grant this service account access to project] step, add the [Pub/Sub Admin] role
2-3. Download Service Account Key
Setup Method:
- Click the action button (⋮) of the created service account
- Select [Manage Keys]
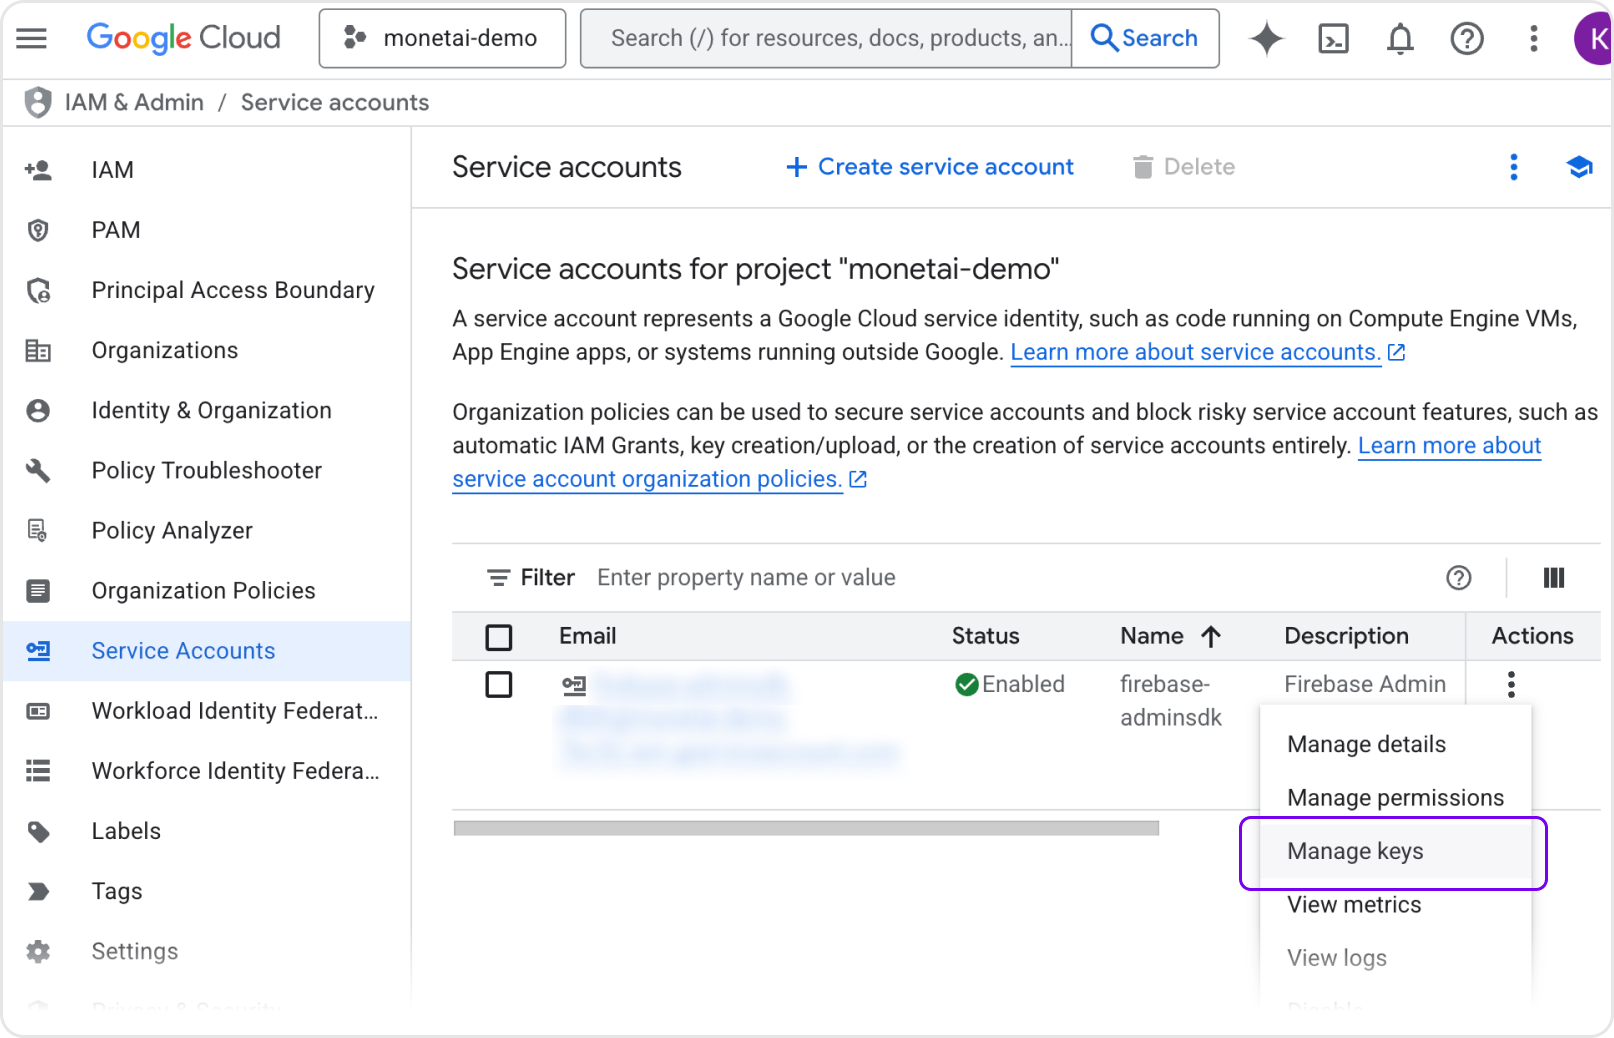
- Click [Add Key] > [Create New Key]
- Select key type as JSON and create and download
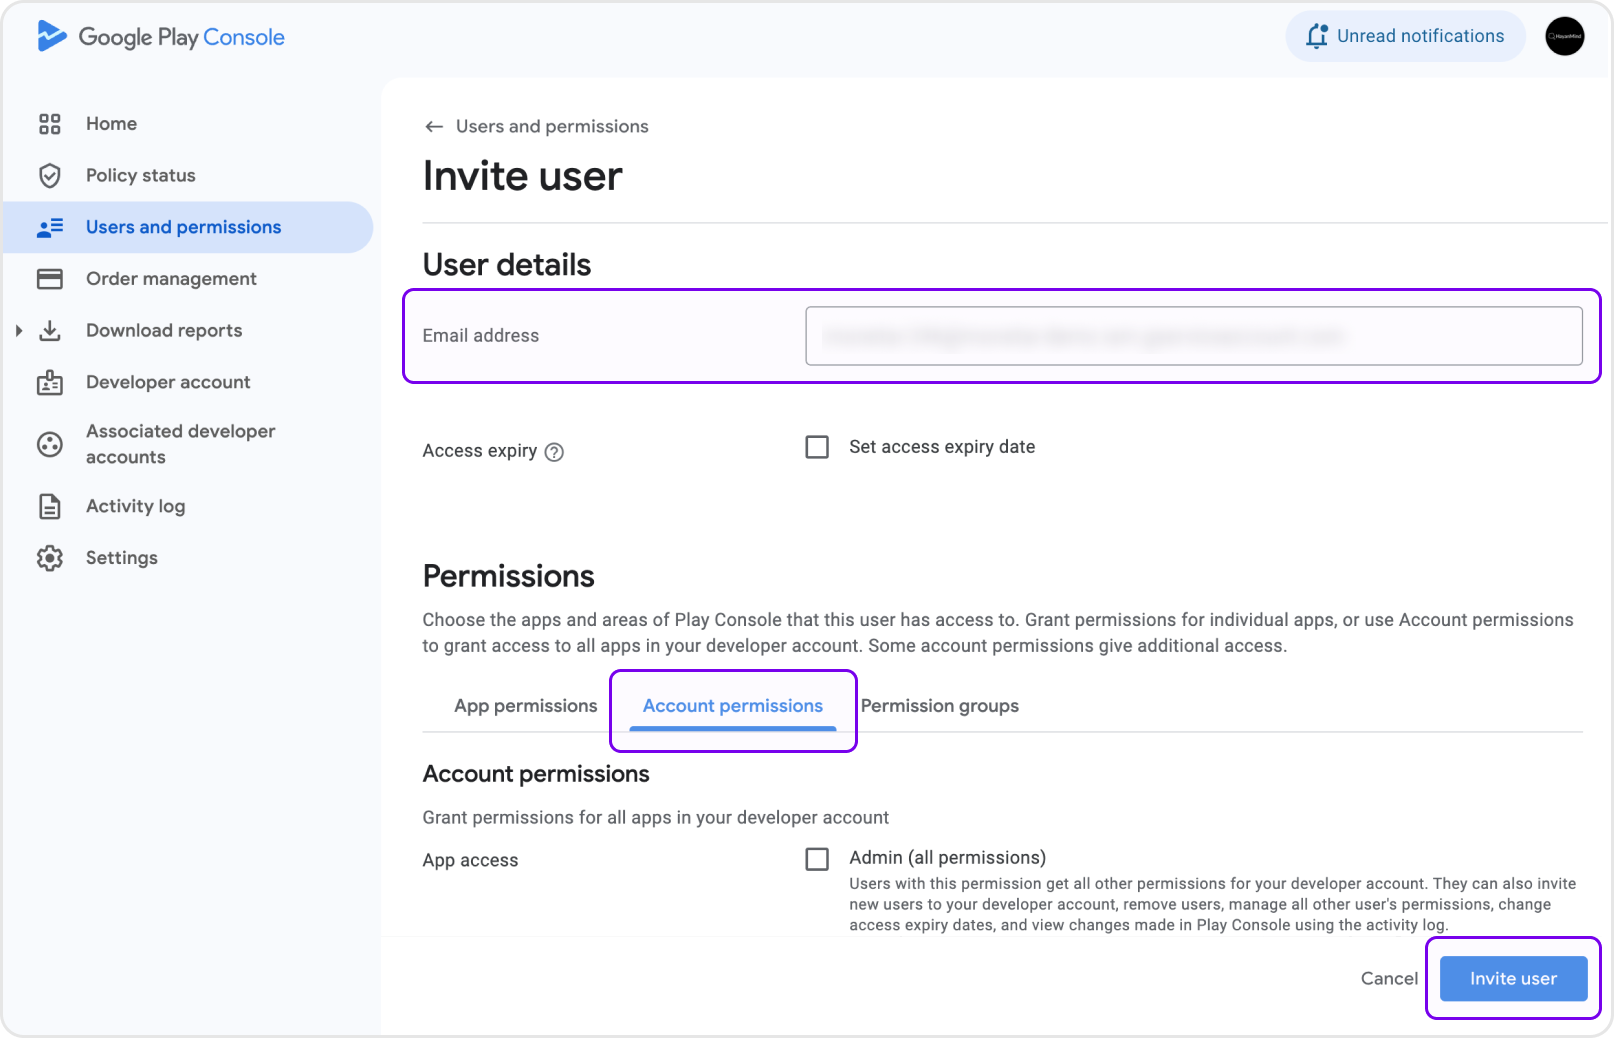
2-4. Grant Google Play Console Permissions
Setup Method:
- Navigate to [Users and Permissions] menu in Google Play Console
- Enter the service account email address that was created
- Under [Permissions], set the following 3 permissions in [Account Permissions]:
- View app information and download bulk reports (read-only)
- View financial data, orders, subscription cancellation survey responses
- Manage orders and subscriptions
- Click [Invite User]
2-5. Register Service Account JSON
Setup Method:
- Copy the content of the Service Account JSON file downloaded in step 2-3
- Paste it into the Monetai Dashboard
- Click the [Verify Permissions] button to confirm all permissions are set correctly
Step 3: Real-time Developer Notifications Setup
Configure Google's Real-Time Developer Notifications (RTDN) to receive real-time purchase information.
3-1. Enable Pub/Sub API
Setup Method:
- Go to Google Cloud Console
- Verify that the same project where the service account was created is selected in the project selection menu at the top
- If Pub/Sub API is disabled, click the [Enable] button

3-2. Select and Connect Pub/Sub Topic
Setup Method:
- Go to Monetai Dashboard
- If you have an existing topic receiving Google real-time developer notifications, select that topic
- If not, click [Create New Topic] to create a new topic
- After selecting the topic, click the [Connect] button
💡 Using Third-party Services (Adapty, etc.)
If you're using third-party services like Adapty and cannot find your existing Pub/Sub topic, you can connect via URL instead of Pub/Sub topic.
For Adapty users:
- Go to your Adapty dashboard
- Navigate to App Settings > Google Play RTDN topic name
- Find the "URL for forwarding raw Google events" field
- Enter the webhook URL provided by Monetai in this field
For more details, refer to Adapty's RTDN documentation.
3-3. Register Topic in Google Play Console
💡 Note for URL Integration Users
If you're connecting via URL (as described in step 3-2), you can skip this step 3-3.
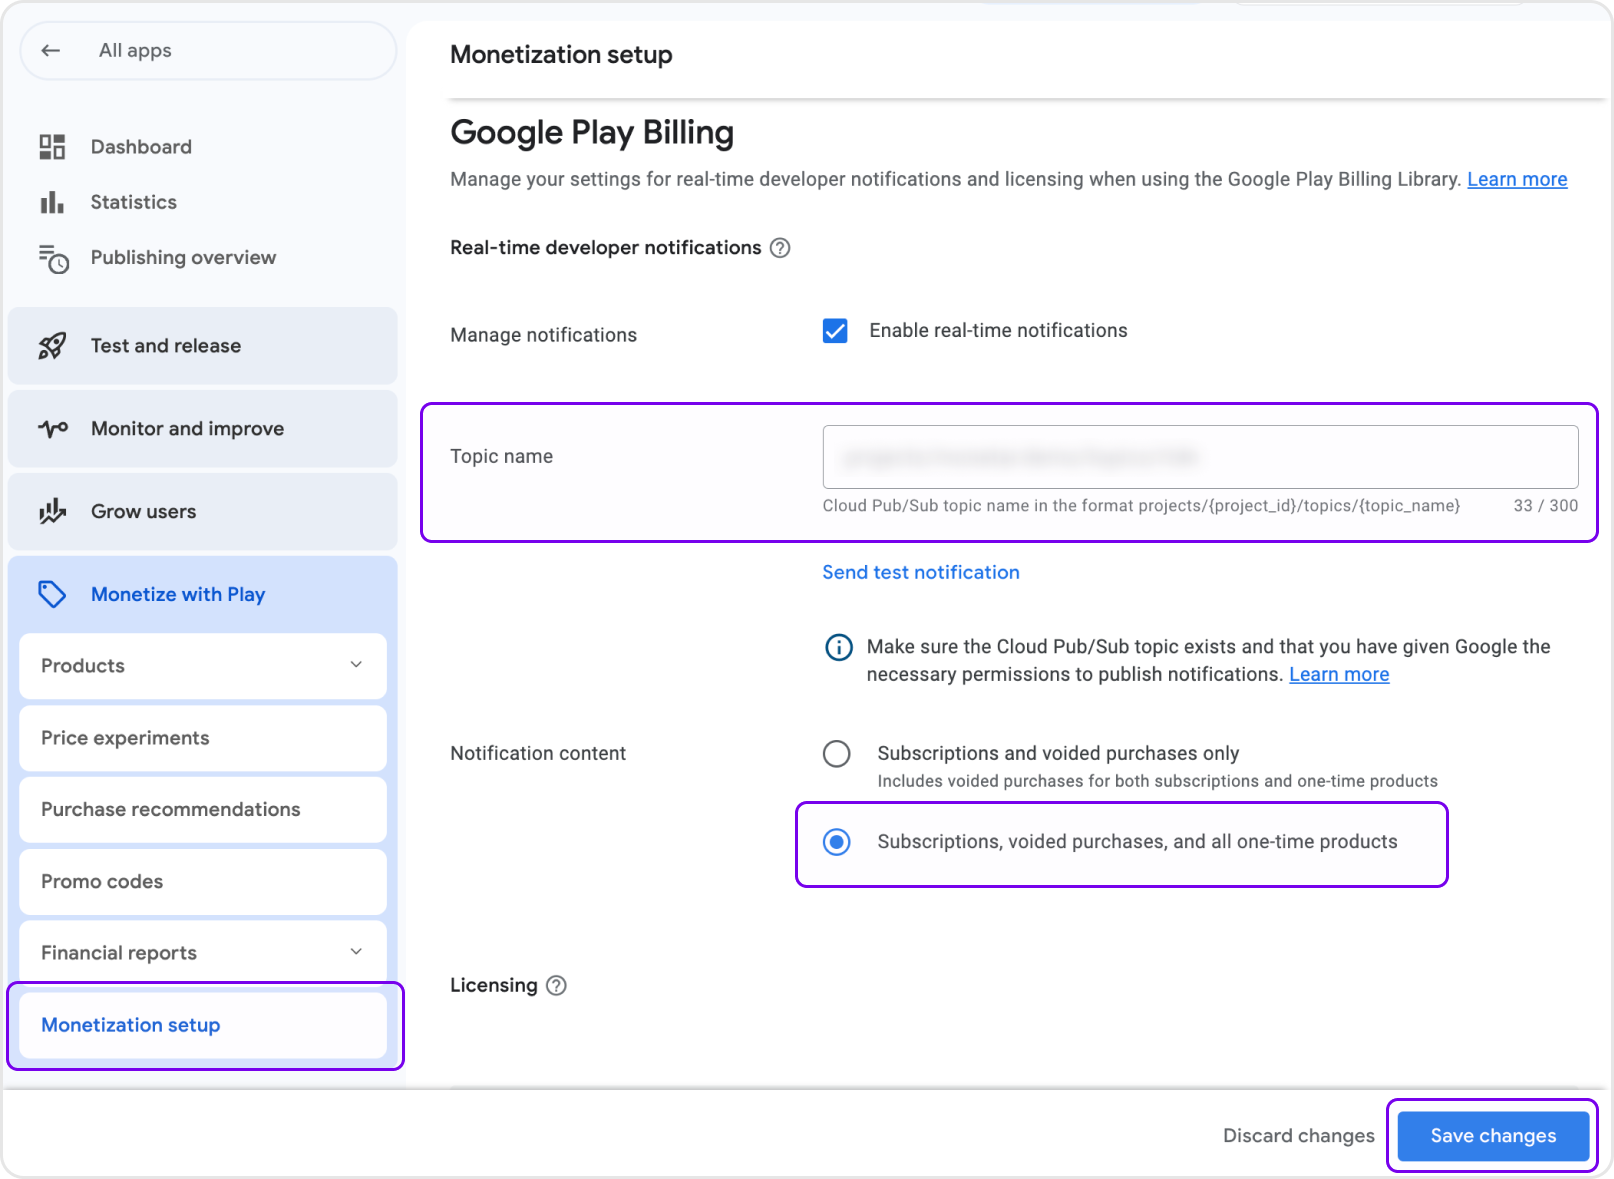
Setup Method:
- Navigate to the dashboard of the app to connect with Monetai in Google Play Console
- Select [Monetization] > [Monetization Settings] from the sidebar
- Copy the Topic ID provided by Monetai and paste it into the [Topic name] field under [Real-time developer notifications]
- Select [Notification content] as "Subscriptions, voided purchases, and all one-time products" and save
3-4. Verify Test Notification
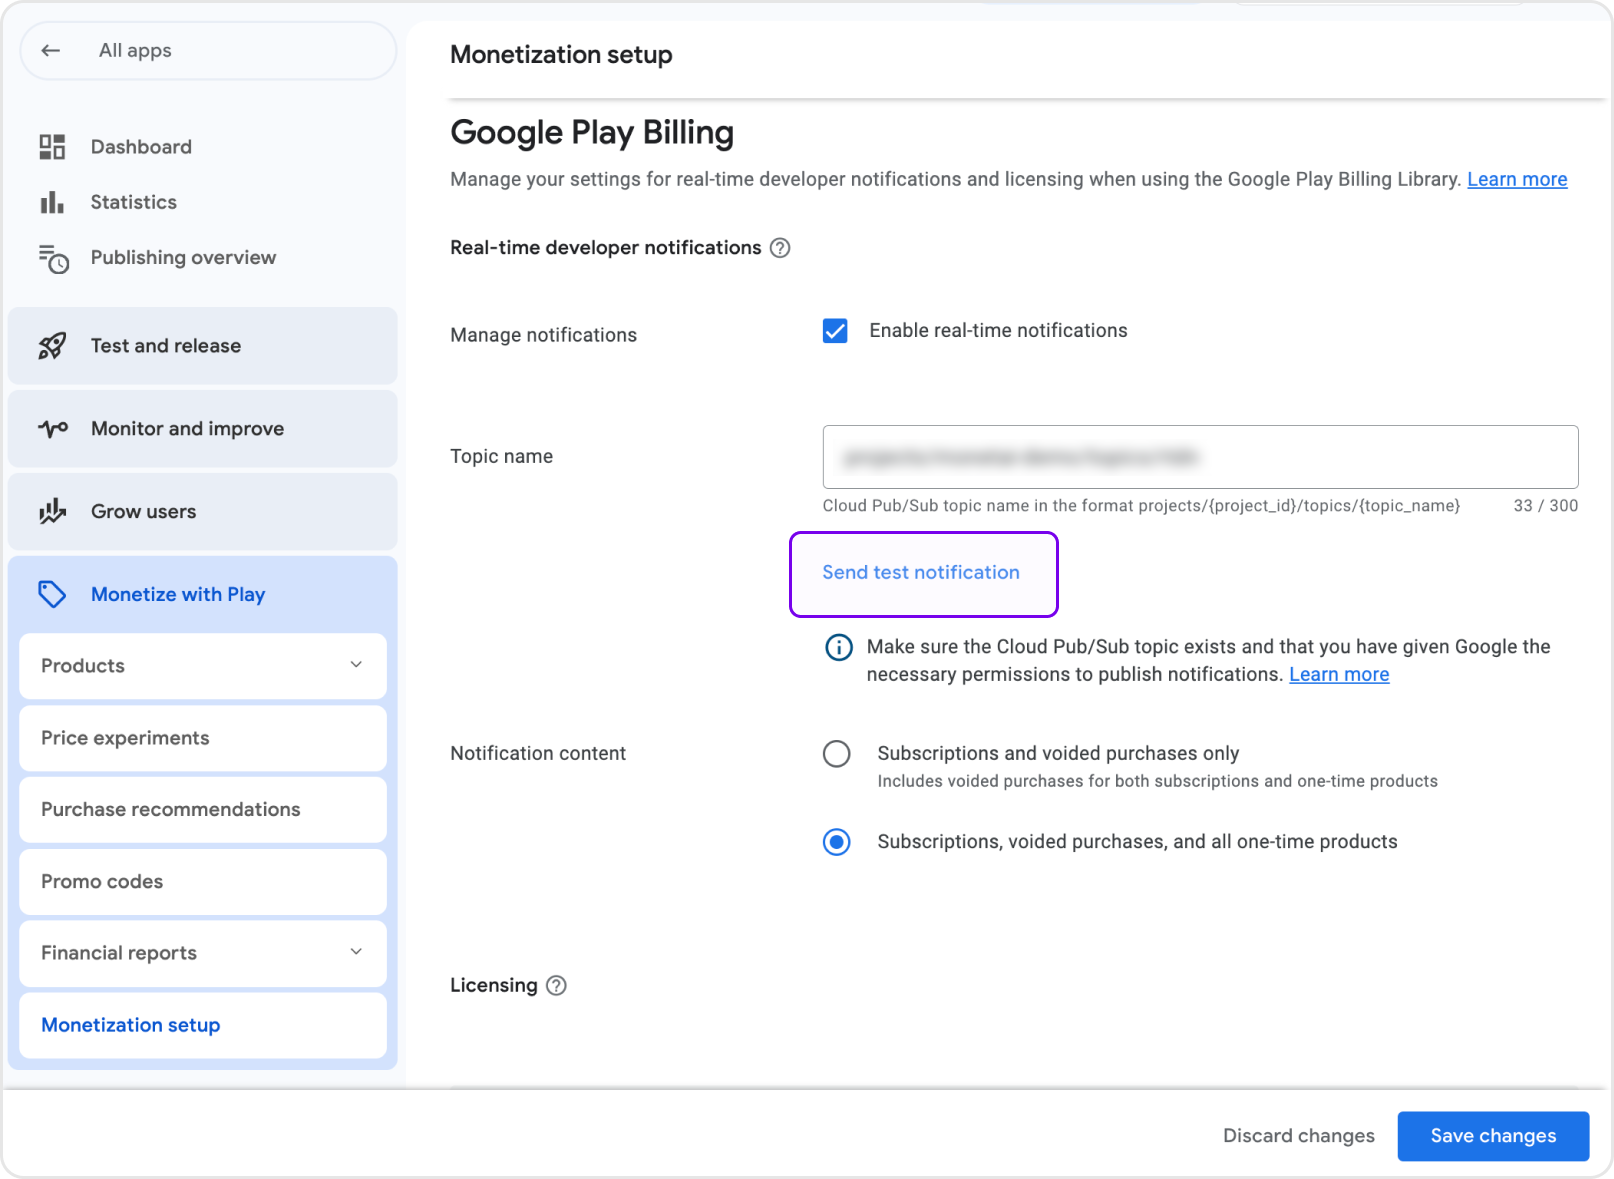
Setup Method:
- Click the [Send Test Notification] button below the [Topic name] field
- Click the [Refresh] button in Monetai Dashboard to confirm notification reception
- When "Reception Complete" message appears, integration is complete
Supported Notification Types
Monetai tracks the following events in real-time through Real-Time Developer Notifications:
Subscription Related
- Subscription free trial start
- Paid subscription start
- Paid subscription renewal
- Refunds
Integration Verification
Once integration is complete, you can verify it using the following methods:
- Test Notification: Send test notification from Google Play Console and confirm reception
Troubleshooting
Frequently Occurring Issues
Q: Cannot find package name A: You can check the package name in the app information after selecting the app in Google Play Console.
Q: Service account permission verification fails A: Please check the following:
- Whether Google Play Android Developer API is enabled
- Whether Pub/Sub Admin role is granted to the service account
- Whether correct permissions are granted to the service account in Google Play Console
Q: Test notification is not received A: Please check the following:
- Whether Pub/Sub API is enabled
- Whether the topic is connected correctly
- Whether the topic is registered in Google Play Console
Support
If you encounter any issues during the integration process, please contact support@monetai.io.
Next Steps
Once Android app integration is complete, proceed to the next steps:
- SDK Installation: Integrate Monetai SDK into your app
- Start Campaign: Launch your first promotion campaign