[Android] Integrate with the Google Play Store
Integrate your Android app with Monetai to start tracking Google Play Store revenue in real-time.
Getting Started
You can start the integration process in two ways:
- Method 1: From the Dashboard Onboarding
- Go to the Monetai Dashboard.
- Begin the app integration setup in the onboarding section at the top of the page.
- Method 2: From the Settings Menu
- Go to Settings > App Settings
- Begin the app integration setup.
Integration Process
The integration process consists of 3 main steps. Please follow the detailed procedures for each step below.
1. Integrate App Package
First, you'll need your app's package name from the Google Play Console.
How to find it
- Log in to Google Play Console
- Select the app to connect with Monetai
- Copy the package name (e.g.,
com.example.app) of the app - Paste it into the Monetai dashboard

2. Create and Configure a Google Service Account
This step involves creating a Google Service Account, which allows Monetai to securely access the Google Play API on your behalf.
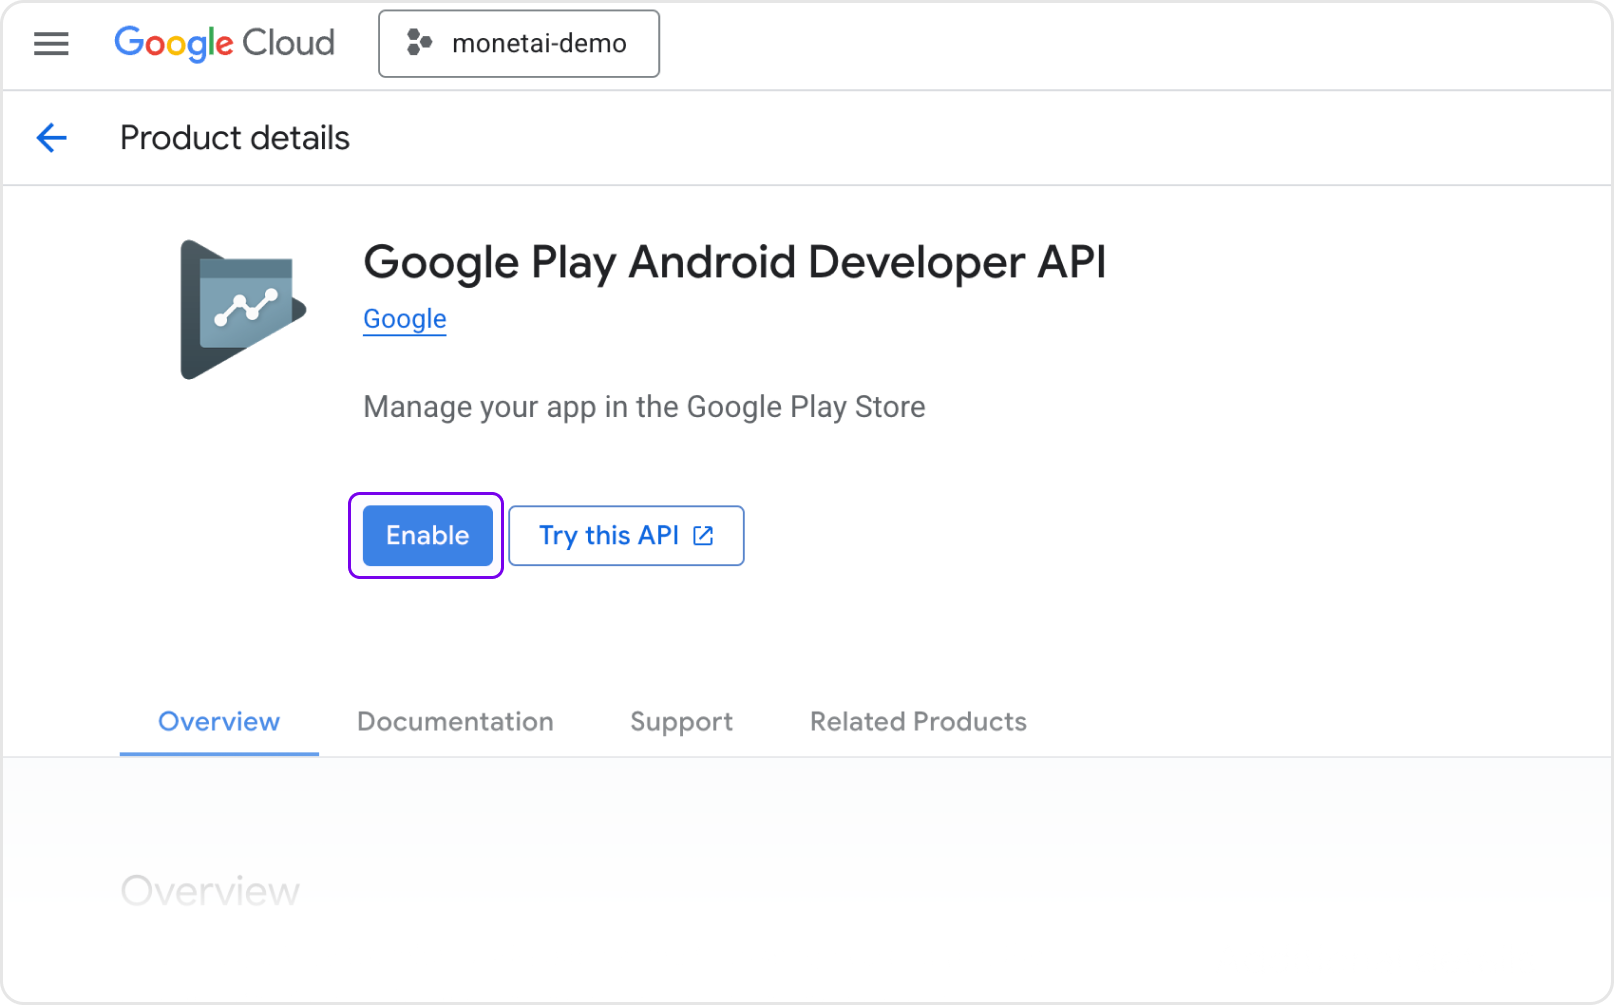
2-1. Enable the Google Play Developer API
- In the Google Play Console, select a project or create one
- Search for "Google Play Android Developer API"
- Click the [Enable] button
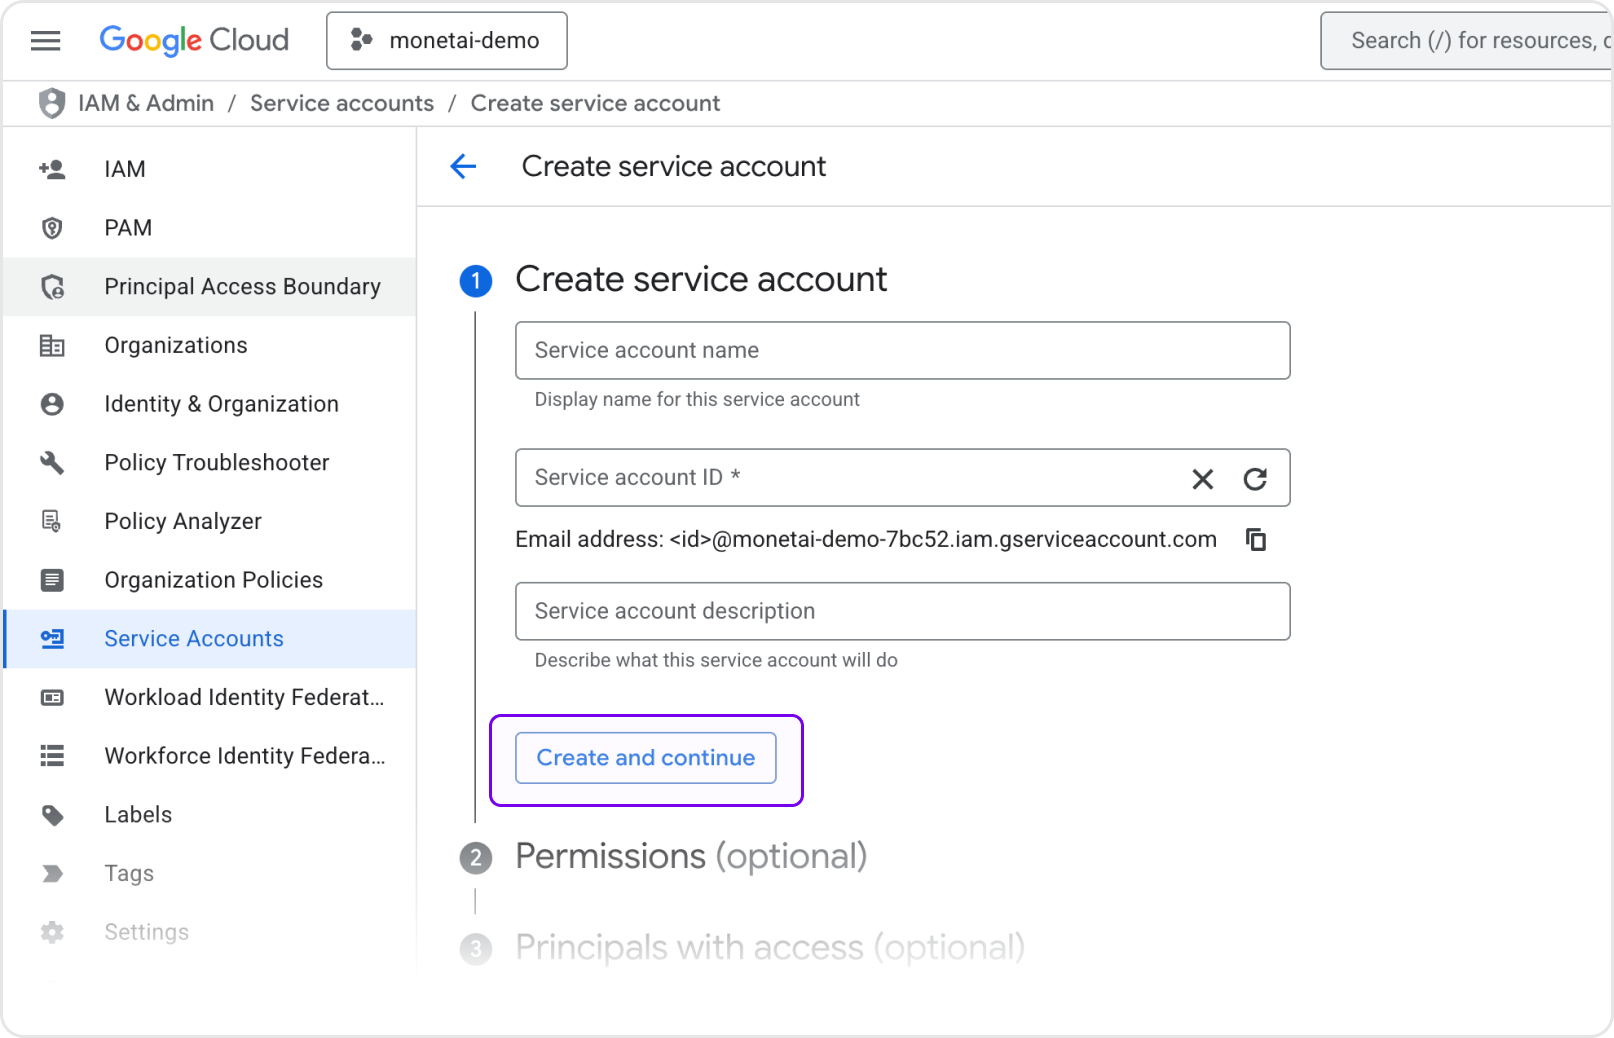
2-2. Create Service Account
-
In the Google Cloud Console, navigate to [IAM & Admin] > [Service Accounts]
-
Click [Create Service Account]
-
Enter a service account name and click [Create and Continue]
-
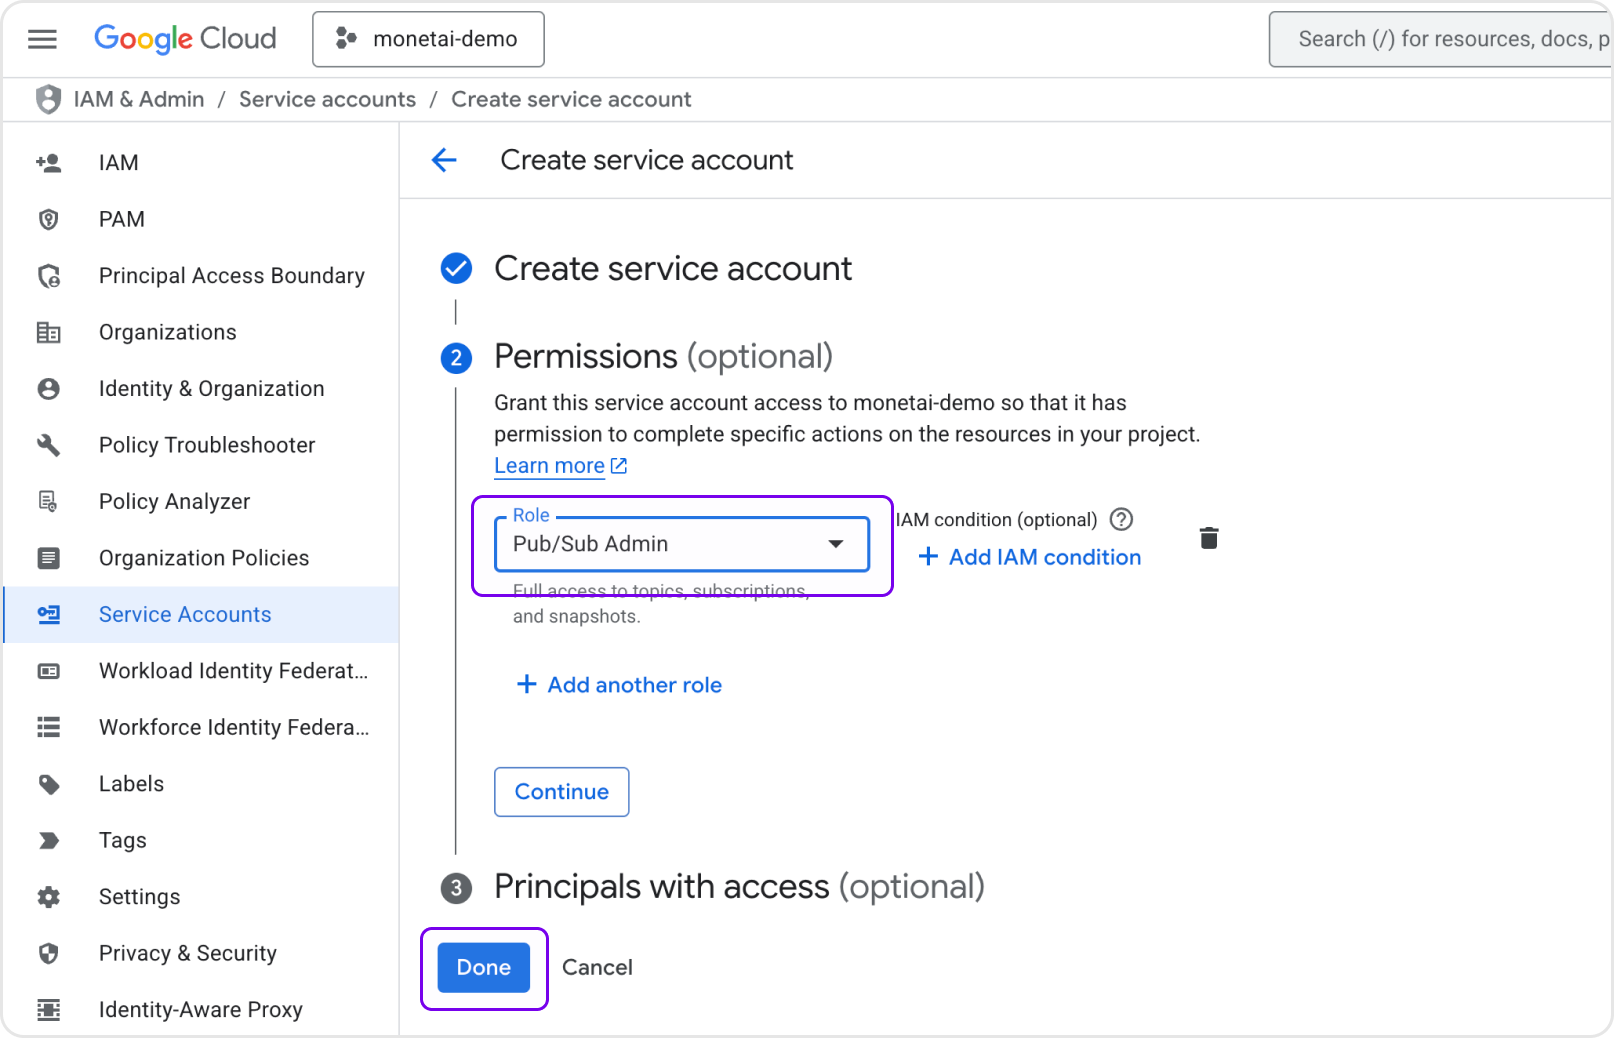
In the "Grant this service account access to project" step, add the [Pub/Sub Admin] role
2-3. Create and Download a Service Account Key
- For the newly created service account, click the action button (⋮) and select [Manage Keys]
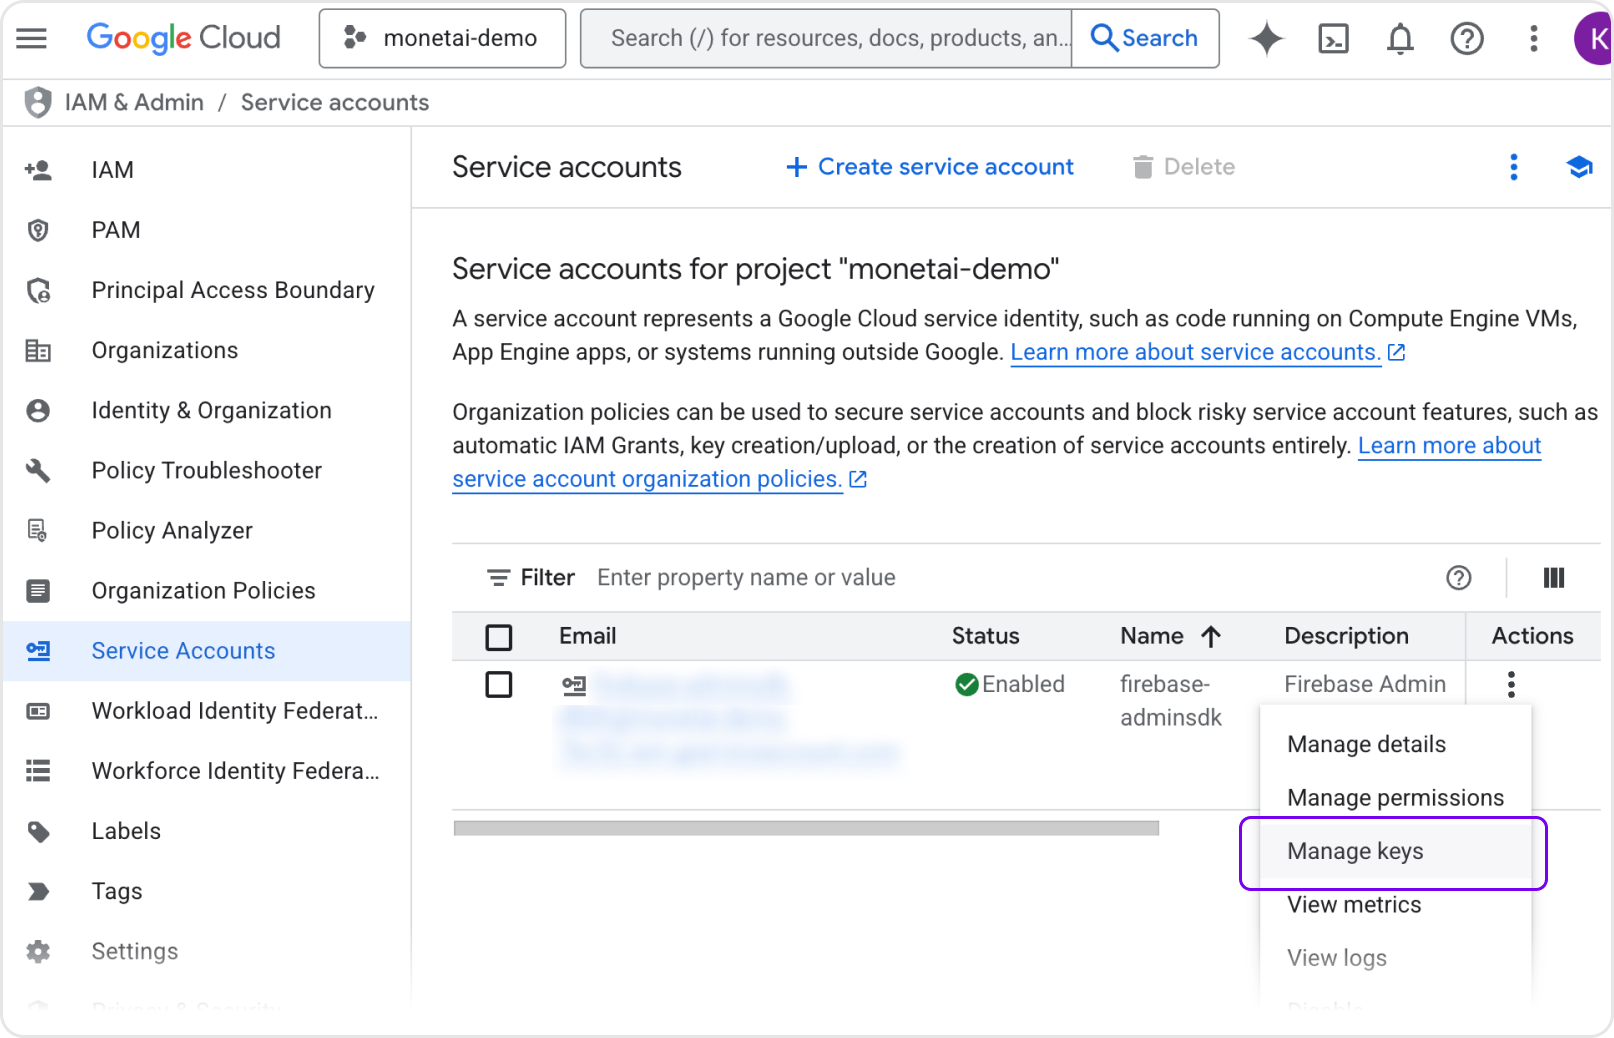
- Click [Add Key] > [Create New Key]
- Select key type as JSON, then click [Create] to download the key file.
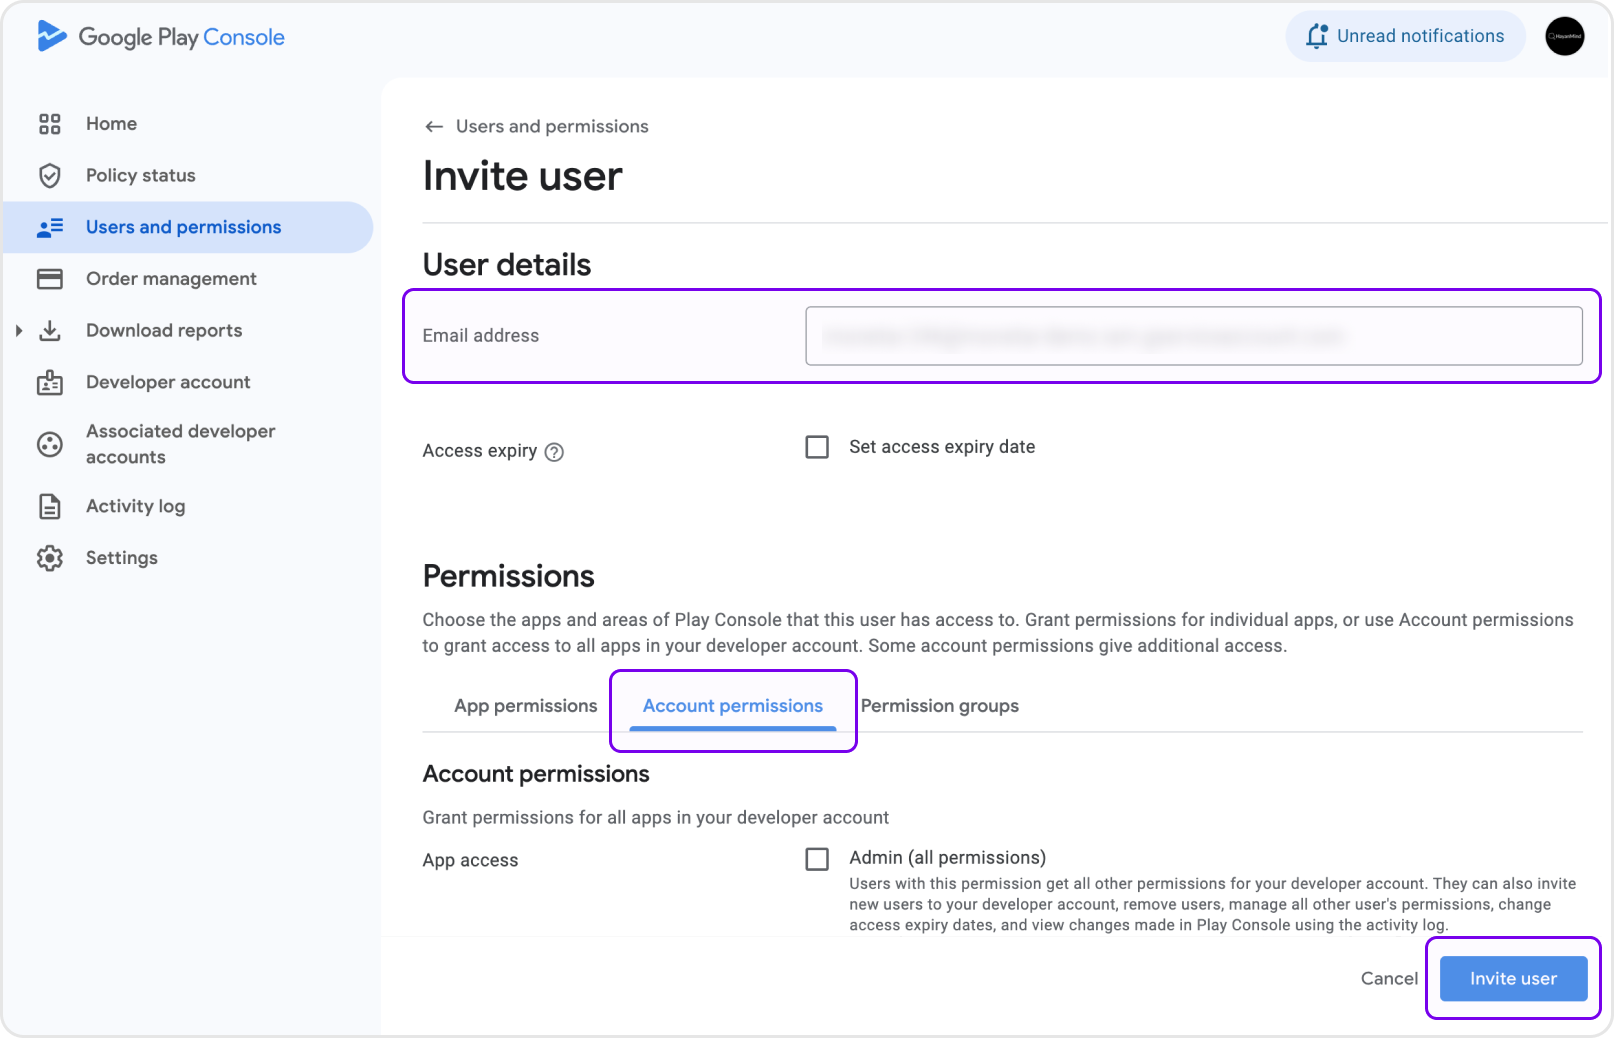
2-4. Grant Permissions in Google Play Console
- In the Google Play Console, navigate to the [Users and Permissions] menu
- Enter the email address of the service account you created in Step 2-2
- Under [Account permissions] tab, grant the following 3 permissions:
- View app information and download bulk reports (read-only)
- View financial data, orders, subscription cancellation survey responses
- Manage orders and subscriptions
- Click [Invite User]
2-5. Upload the Service Account JSON to Monetai
- Open the JSON key file you downloaded in Step 2-3 and copy its entire content
- Paste the content into the Monetai Dashboard
- Click the [Verify Permissions] button to confirm all permissions are set correctl
3. Set Up Real-Time Developer Notifications (RTDN)
Finally, configure Google's RTDN to send real-time purchase information to Monetai.
3-1. Enable Pub/Sub API
- Go to the Google Cloud Console
- Ensure the same project where you created the service account is selected
- If Pub/Sub API is disabled, click the [Enable]

3-2. Select or Create Pub/Sub Topic
- Go to the Monetai Dashboard
- If you have an existing topic for Google RTDN, select it from the list
- If not, click [Create New Topic]
- After selecting or creating a topic, click the [Connect] button
💡 Using Third-party services (e.g., RevenueCat, Adapty)?
If your third-party service already has a Pub/Sub topic, select and connect it.
If you can’t find an existing topic (when using a GCP project from a third-party), connect via a Webhook URL.
See your third-party’s RTDN Forwarding documentation for details.
- Adapty documentation: In App Settings → Google Play RTDN topic name, paste the Monetai Webhook URL into “URL for forwarding raw Google events”.
3-3. Register the Topic in Google Play Console
💡 Note for URL Integration Users
If you connected via URL in the previous step, you can skip this step.
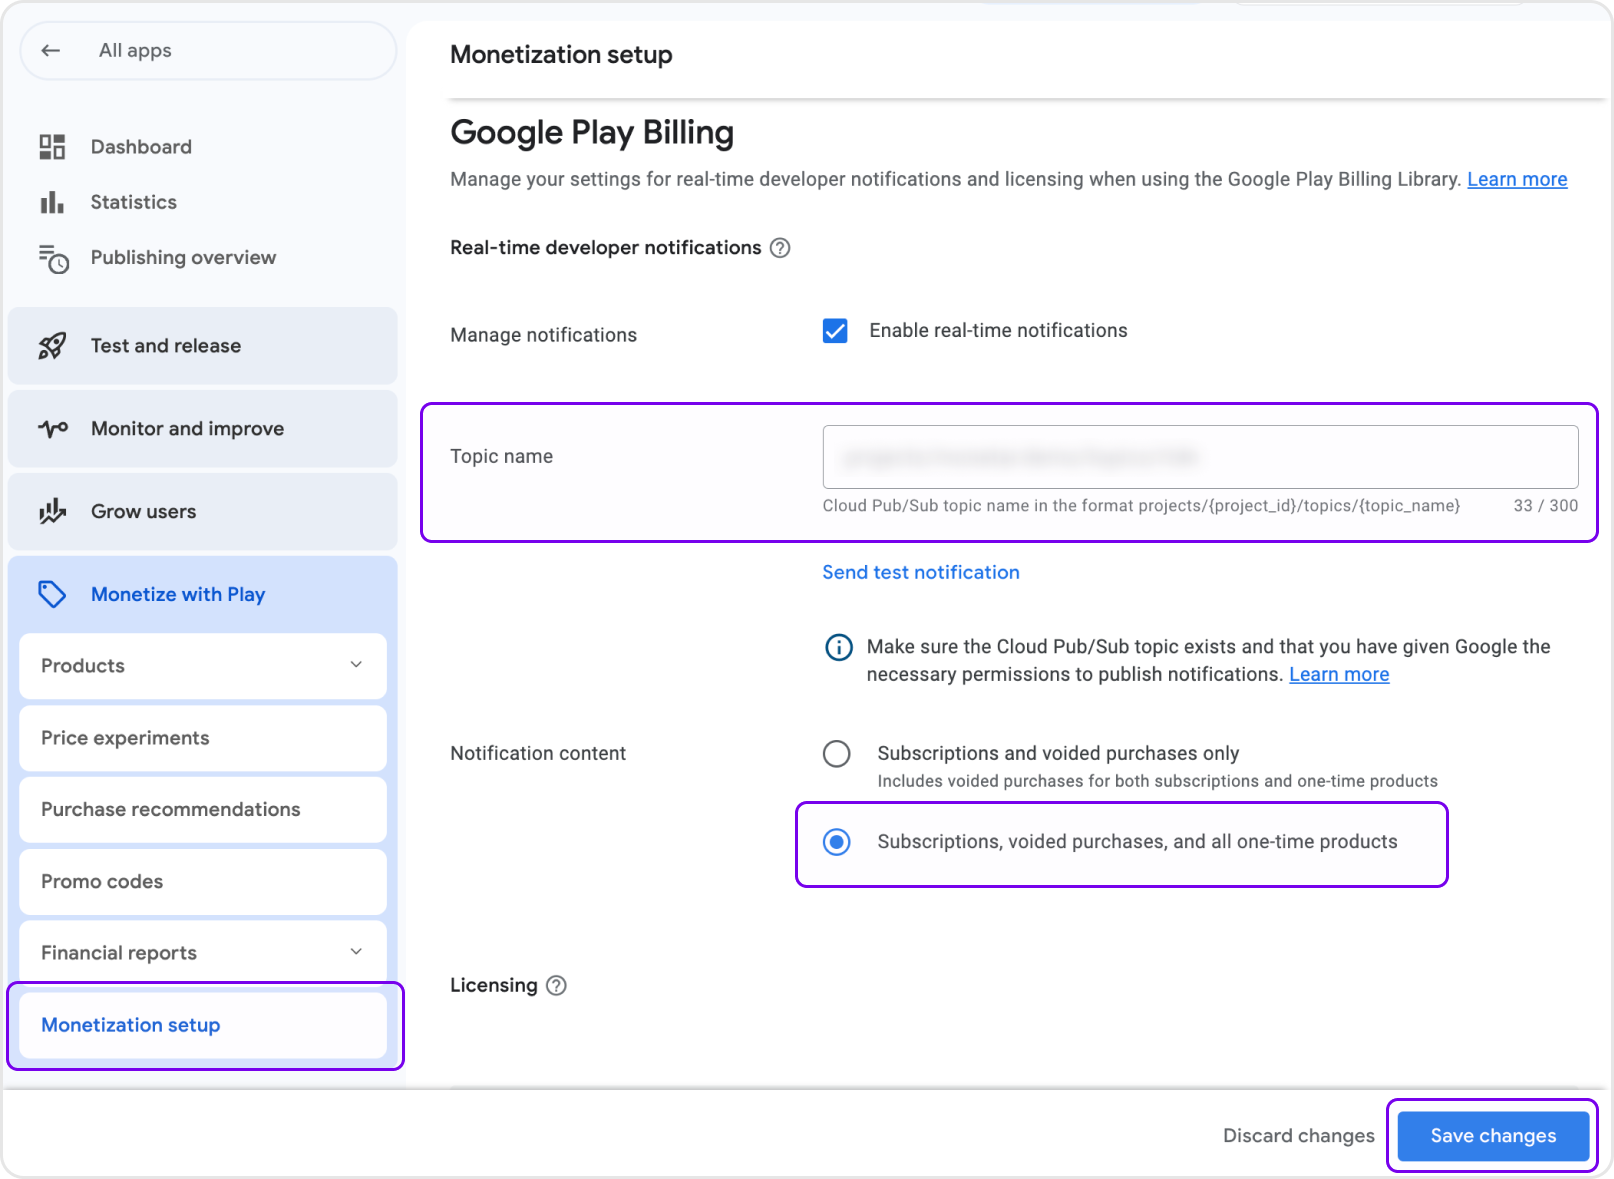
- In the Google Play Console, go to your app's dashboard
- From the sidebar, select [Monetize with Play] > [Monetization setup]
- Under [Real-time developer notifications], paste the Topic ID provided by Monetai into the [Topic name] field
- Select "Subscriptions, voided purchases, and all one-time products" for [Notification content] and save
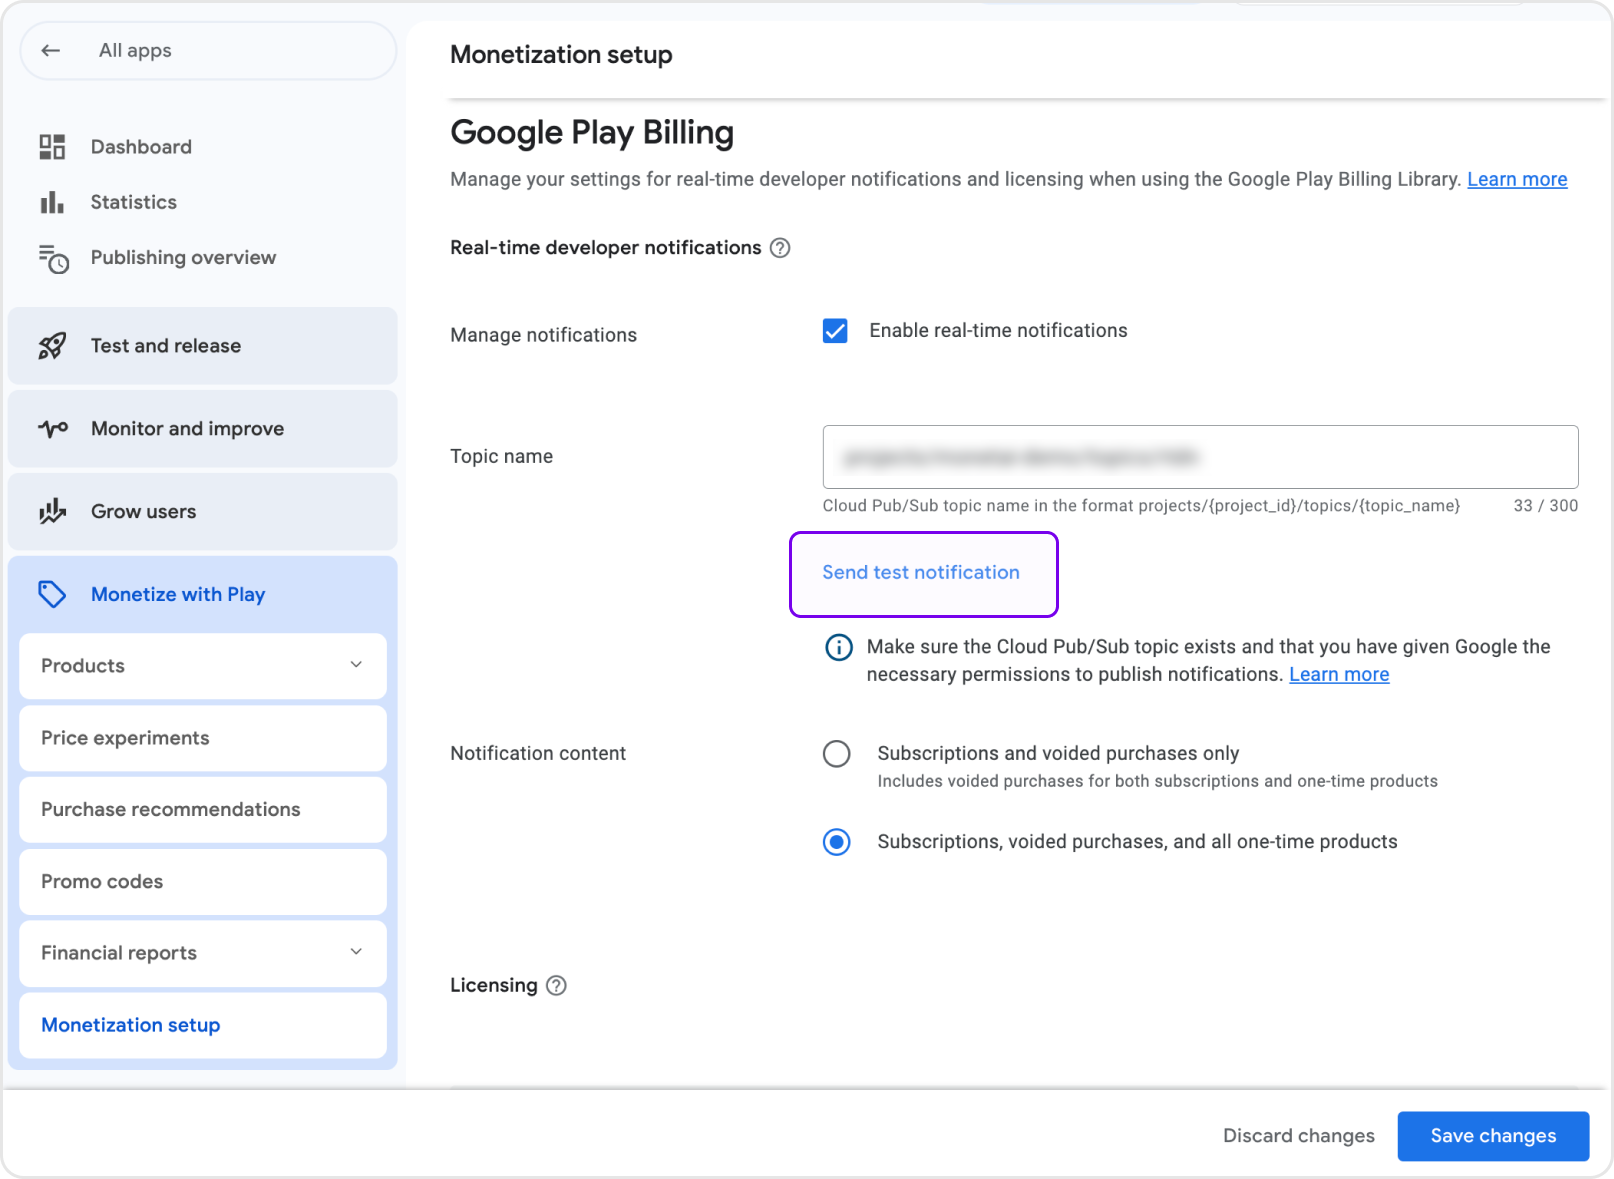
3-4. Verify with a Test Notification
- In the same section, click the [Send test notification] button
- Return to the Monetai Dashboard, and click the [Refresh] button
- When the "Received" message appears, the integration is successful
What We Track
Once integrated, Monetai tracks the following key events in real-time via Real-Time Developer Notifications:
Subscription Events
- Subscription free trial start
- Paid subscription start
- Paid subscription renewal
- Refunds
Verifying the Integration
After completing the setup, you can confirm everything is working correctly by sending a test notification from the Google Play Console and verifying its reception in the Monetai dashboard.
Troubleshooting
Common Issues
- Q: I can't find the package name.
- A: You can check the package name in the app information after selecting the app in Google Play Console.
- A: You can check the package name in the app information after selecting the app in Google Play Console.
- Q: The service account permission verification is failing.
- A: Please double-check the following:
- The Google Play Android Developer API is enabled.
- The service account has the Pub/Sub Admin role in Google Cloud.
- The correct financial and order management permissions are granted in Google Play Console.
- A: Please double-check the following:
- Q: The test notification is not being received.
- A: Please double-check the following:
- The Pub/Sub API is enabled in your Google Cloud project.
- The Pub/Sub topic is correctly connected in the Monetai dashboard.
- The Topic ID is correctly registered in the Google Play Console.
- A: Please double-check the following:
Support
If you run into any trouble during the integration, don't hesitate to contact us at support@monetai.io.
Next Steps
With Android integration complete, you're ready for the next steps: